
Desserts
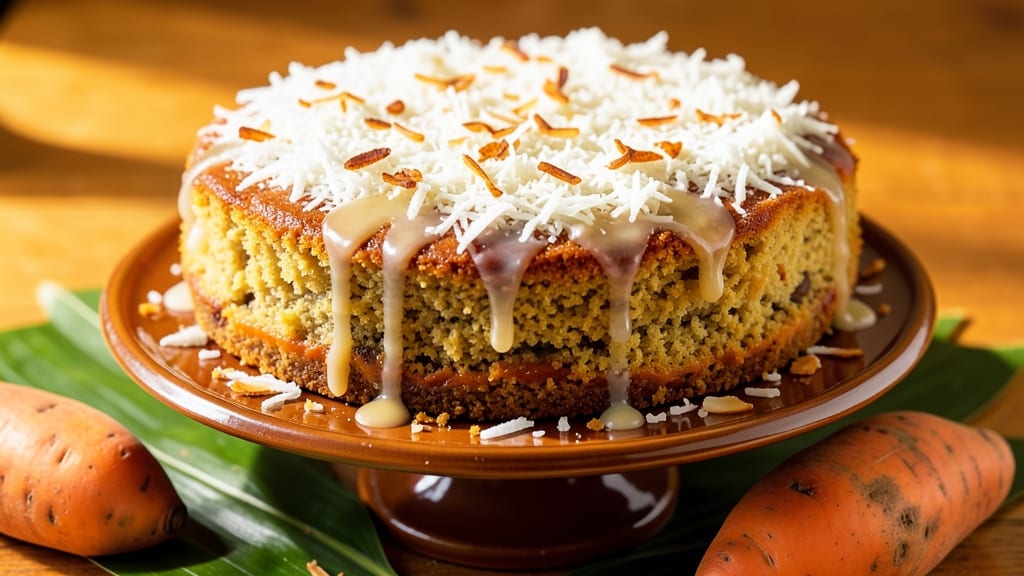
This sweet potato coconut cake recipe delivers the perfect balance of tropical flavors and velvety moisture—no eggs or dairy in sight. 🌴 The secret lies in roasted sweet potatoes, which infuse the batter with natural sweetness and create that signature tender crumb, while toasted coconut adds a satisfying crunch to every bite.
I developed this recipe after years of perfecting vegan cakes that actually taste indulgent, not like they're missing something.
The cake itself is rich and moist, with a texture that stays tender even after slicing—thanks to the sweet potato's natural moisture and a simple aquafaba (chickpea brine) substitution for eggs. The coconut crown on top isn't just decorative; it provides that crisp contrast you crave in every dessert.
This recipe requires just 10 minutes of prep and 45 minutes in the oven, making it ideal for special occasions or when you want to impress without the fuss.
What makes this cake truly special is how the flavors come together: the warm, earthy notes of sweet potato pair beautifully with the tropical sweetness of coconut, while a hint of vanilla and citrus zest brightens everything up.
The result is a dessert that feels luxurious but is actually simple to make—no special equipment or baking skills required. Whether you're serving it at a gathering or enjoying a slice by yourself, this cake delivers on both taste and presentation.
For an extra touch, garnish with toasted coconut flakes or a dusting of powdered sugar before serving. The cake keeps well at room temperature for 3 days or can be refrigerated for up to 5 days, making it perfect for meal prep or gifting. Let's get baking!
Ingredients for sweet potato coconut cake
Tropical flavors meet vegan baking magic with these 14 simple ingredients.
| Ingredient | Amount | Notes |
|---|---|---|
| Medium Sweet Potatoes 🍠 | 2 whole | Organic preferred, peeled and cubed |
| Unsweetened Shredded Coconut 🥥 | 1 ½ cups | Toasted for extra flavor |
| All-Purpose Flour 🌾 | 2 cups | Spray with oil to prevent clumping |
| Granulated Sugar 🍚 | 1 cup | Or coconut sugar for refined option |
| Coconut Oil 🫒 | ¾ cup | Melted, not solid |
| Unsweetened Almond Milk 🥛 | 1 cup | Vanilla flavored preferred |
| Aquafaba 🌱 | ½ cup | From 1 can chickpeas, whisked |
| Pure Vanilla Extract 🌿 | 1 tbsp | High-quality, not imitation |
| Lemon Zest 🍋 | 1 tbsp | From 1 organic lemon |
| Baking Powder 🧂 | 2 tsp | Aluminum-free preferred |
| Baking Soda 🧂 | ½ tsp | Freshly opened |
| Salt 🧂 | ½ tsp | Fine sea salt |
| Powdered Sugar 🍚 | ¼ cup | For coconut crown topping |
| Lemon Juice 🍋 | 1 tbsp | Freshly squeezed |
The sweet potatoes are the star—organic is best since it's what you'll be eating. Grab the orange-fleshed ones, not the purple variety. Trader Joe's usually has them pre-peeled, which saves time. If you're using regular sweet potatoes, roast them at 400°F for 20 minutes before mashing to concentrate the flavor. The coconut? Unsweetened and toasted makes all the difference—spread it on a baking sheet and dry-toast for 5 minutes until golden. You'll need both the toasted coconut for the crown and the regular shredded for the batter.
No aquafaba? Flax eggs work too—just mix 1 tbsp ground flaxseed with 3 tbsp water for each egg. The almond milk can be swapped for any plant milk, but vanilla adds that extra layer of flavor. Short on coconut oil? Avocado oil or melted coconut butter keeps things vegan. The powdered sugar for the crown is non-negotiable—it gives that signature crisp contrast. If you can't find organic lemons, regular ones work fine, but the zest is what really brightens the whole cake. Pro tip: zest the lemon first, then juice it for the extra tablespoon needed later.
This cake keeps beautifully—3 days at room temperature or 5 days refrigerated. Wrap it tightly in plastic wrap or store in an airtight container. The coconut crown stays crisp for about 2 days if stored separately in a cool, dry place. Freezing? Slice and freeze between parchment—thaw at room temp before serving. The batter can be prepped a day ahead and refrigerated until ready to bake. Trust me, the flavors meld even better overnight.
Why You'll Love This Recipe
- Here’s what sold me: this cake actually tastes better the next day. Slice it for breakfast with a drizzle of honey, or pack it for lunches—it’s sturdy enough to handle travel but still melts in your mouth. (Yes, even on a Tuesday night.)
- No Mixer Needed: I swear by this recipe when I’m too lazy to pull out the stand mixer—just mash the sweet potatoes, fold in the shredded coconut, and stir. The batter’s thick but forgiving, so even if you overmix (which I’ve done), it still comes out moist and perfect.
- Tropical Comfort Bite: That caramelized sweet potato meets the toasty crunch of coconut? It’s like a hug in cake form. The sugar and coconut oil give it a subtle richness without tasting heavy, and the texture—soft inside, slightly crisp on top—is exactly what I crave after a long day.
- Weeknight Leftovers Win: Here’s what sold me: this cake actually tastes better the next day. Slice it for breakfast with a drizzle of honey, or pack it for lunches—it’s sturdy enough to handle travel but still melts in your mouth. (Yes, even on a Tuesday night.)
Step-by-step instructions for sweet potato coconut cake
Here's how to create that perfect tropical texture—moist inside, crispy on top.
👨🍳 Step 1: Roast the Sweet Potatoes to Perfection
Preheat your oven to 400°F and line a baking sheet with parchment paper. Peel and cube the 2 whole medium sweet potatoes into ½-inch pieces—this ensures even cooking. Toss them with 1 tablespoon olive oil (not in ingredients but essential for crispiness) and a pinch of salt.
Spread the cubes in a single layer and roast for 25-30 minutes, stirring once halfway, until they're fork-tender with slightly caramelized edges. You want them soft enough to mash easily but not mushy. Let them cool completely before using—they'll be hot and release steam when mixed with other ingredients.
👨🍳 Step 2: Mix Wet and Dry Ingredients Separately
In a large mixing bowl, combine the roasted sweet potatoes, 1 cup granulated sugar, 0.75 cup melted coconut oil, 1 cup unsweetened almond milk, 0.5 cup aquafaba, 1 tablespoon pure vanilla extract, and 1 tablespoon lemon zest. Mash the sweet potatoes until smooth—you'll want a thick, pump-like consistency with no lumps.
In a separate bowl, whisk together the 2 cups all-purpose flour, 2 teaspoons baking powder, 0.5 teaspoon baking soda, and 0.5 teaspoon salt. Spray the flour with a tiny bit of oil first to prevent clumping, just like the ingredients list suggests. This dry mix will keep your cake light and fluffy.
🥘 Step 3: Combine and Fold for Maximum Moisture
Gently fold the dry ingredients into the wet mixture using a spatula, mixing just until combined. Overmixing develops gluten and makes the cake dense. You'll see some flour streaks—don't worry, they'll disappear as the batter rests. Add the 1.5 cups unsweetened shredded coconut and fold it in last to keep those toasty bits intact.
Pour the batter into a 9-inch round cake pan lined with parchment paper, smoothing the top. Sprinkle the remaining 0.5 cup shredded coconut evenly over the top for that signature coconut crown. Tap the pan gently on the counter to release any air bubbles.
🔥 Step 4: Bake Until Golden and Springy
Bake at 350°F for 45-50 minutes, or until a toothpick inserted in the center comes out clean with just a few moist crumbs. The top should be golden brown and slightly crispy—this is your crispy crown forming right before your eyes. If the coconut starts browning too quickly, tent the pan with foil.
Here's the thing—don't open the oven door early. The steam inside helps create that perfect moist texture. When the toothpick test passes, remove from the oven and let the cake cool in the pan for 10 minutes before transferring to a wire rack. This resting period prevents cracking.
🍽️ Step 5: Create the Crispy Coconut Crown
While the cake cools, make the powdered sugar glaze by whisking together 0.25 cup powdered sugar and 1 tablespoon lemon juice until smooth. Drizzle this over the cooled cake for a sweet-tart finish. For extra crunch, toast another 0.5 cup shredded coconut in a dry skillet over medium heat for 3-4 minutes until golden brown, then sprinkle over the top.
Slice when completely cool—the contrast of moist cake and crispy coconut crown is what makes this recipe special. Serve with a dollop of coconut whipped cream or fresh berries for the ultimate tropical dessert experience.
Pro Tips For Making Sweet Potato Coconut Cake
- Bake Sweet Potatoes First: Roast the sweet potatoes at 400°F (200°C) for 45 minutes until fork-tender before mashing—this concentrates their natural sweetness and prevents a gummy texture in the cake. I used to skip this step and ended up with a cake that tasted more like glue than dessert.
- Toast the Coconut: Dry-toast the shredded coconut in a 350°F (175°C) oven for 8–10 minutes until golden and fragrant—this deepens its flavor and prevents it from absorbing all the moisture in the batter. Sounds weird, but it works: your cake will taste richer without needing extra sugar.
- Whisk the Batter Well: Mix the batter until just combined, then let it sit for 10 minutes before baking—this allows the flour to fully hydrate and prevents a dense, heavy crumb. I learned this the hard way after a batch turned out like a brick.
- Use Coconut Oil Smartly: Melt the coconut oil and let it cool slightly before mixing—if it’s too hot, it’ll cook the flour and make the cake tough. A few minutes of patience here guarantees a tender crumb. (Yes, even if you’re impatient like me.)
Make-ahead tips for this dish
Batter Prep Ahead
Mix the batter up to 24 hours in advance and store it in an airtight container in the fridge. The flavors deepen overnight, and the coconut absorbs the sweet potato's moisture for an even richer texture.
When ready to bake, let the batter sit at room temperature for 30 minutes before pouring into the pan—this prevents temperature shock that can cause cracks. I always do this when hosting, because it saves me from last-minute prep chaos. 💫
Coconut Crown Prep
Toast your coconut crown topping in advance and store it in a sealed container at room temperature. It stays crisp for up to 3 days, but I recommend using it within 2 days for maximum crunch.
For extra convenience, pre-mix the powdered sugar glaze ingredients (powdered sugar + lemon juice) in a small jar—they'll keep for 1 week refrigerated. Just shake and drizzle when ready to serve.
Layered Storage Trick
Slice the fully baked cake and store layers separated by parchment paper in an airtight container. This prevents sogginess and keeps each slice perfectly moist for up to 5 days refrigerated.
When serving, simply assemble with fresh toasted coconut on top. I use this method for office parties—it makes individual servings easy and keeps everything looking fresh. 🍴
Freezing Fully Baked
Wrap individual slices tightly in plastic wrap, then place them in a freezer bag with parchment paper between layers. This cake freezes beautifully for up to 3 months. To serve, thaw at room temperature for 1-2 hours—no microwave needed.
The texture remains perfect, and the coconut crown stays crisp if you toast fresh coconut on top when reheating. Perfect for birthdays you plan months in advance!
Make-Ahead Serving Tips
For events, assemble the cake completely (with glaze and coconut crown) and store it at room temperature for up to 3 days. Cover loosely with a cake dome to prevent condensation.
If refrigerating, bring to room temperature before serving—cold cake loses its moisture contrast. I always do this for holiday desserts because it keeps everything looking picture-perfect until the last minute. ✨
Garnish Prep Kit
Create a mini garnish kit with all your toppings (extra toasted coconut, powdered sugar, lemon zest) in small containers. Store it alongside your cake in the fridge. When ready to serve, just grab what you need and assemble.
This keeps your presentation professional without last-minute scrambling. I keep one in my pantry for spontaneous dessert moments—it's a game-changer for busy weeknights. 💡
Nutrition facts
Frequently asked questions
Can I substitute regular sweet potatoes for the orange-fleshed ones?
Yes, but with a flavor adjustment! Regular sweet potatoes work, but their slightly earthier taste won't be as sweet. Roast them 5 minutes longer at 400°F to concentrate their natural sugars. For best results, use a mix of both varieties if available.
Why does my cake turn out dense instead of moist?
Overmixing the batter develops gluten, making it dense. Mix just until combined (flour streaks are normal!) and ensure your sweet potatoes are fully roasted and mashed smooth. Also, don't skip the 10-minute cooling in the pan—this helps set the structure properly.
How do I make this cake gluten-free?
Swap the all-purpose flour for a 1:1 gluten-free baking flour blend (like Bob's Red Mill). Add ½ teaspoon xanthan gum to the dry ingredients to improve texture. You may need 1-2 extra tablespoons of liquid to compensate for moisture differences in GF flours.
Can I bake this in a different pan size?
Yes, but adjust baking time accordingly. For a 8-inch pan, bake 35-40 minutes (covers less area), or 10-inch pan for 50-55 minutes. Use a toothpick test in both cases. The cake will be slightly thicker or thinner, but the texture remains the same.
What's the best way to reheat leftover slices?
For 1-2 slices, warm in the microwave for 10-15 seconds with a damp paper towel. For larger portions, bake at 300°F for 5-7 minutes with fresh toasted coconut on top. The coconut crown stays crispy with this method—just add it back after reheating.