
Side Dishes
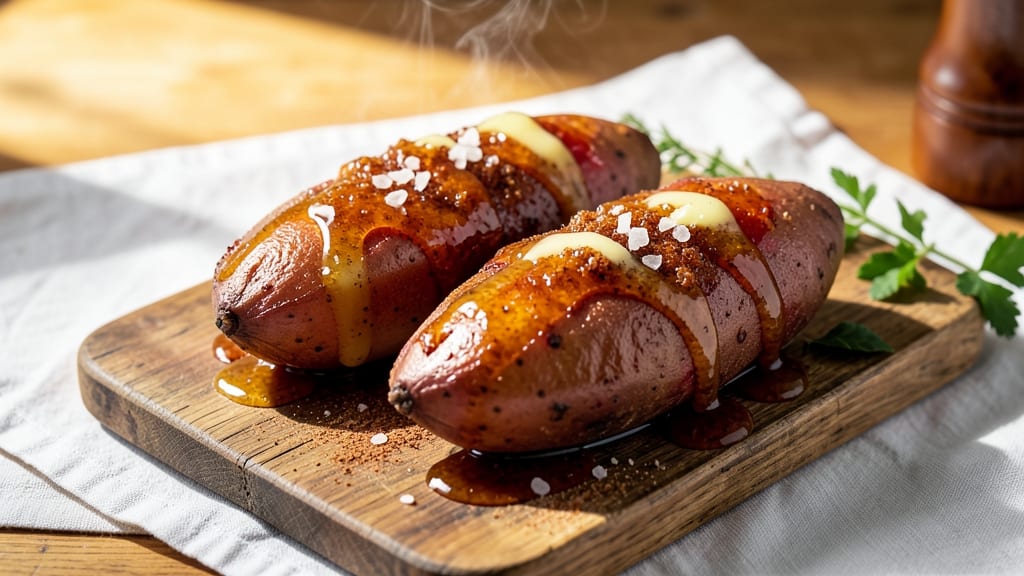
This baked glazed sweet potato recipe transforms humble sweet potatoes into a restaurant-quality side dish with caramelized edges and molten centers—no fancy techniques required. The secret lies in a simple glaze of butter, brown sugar, and cinnamon that creates a sticky, sweet crust while keeping the inside tender.
I've perfected this method over years of holiday dinners, and it consistently delivers that perfect balance of textures and flavors everyone craves.
The process couldn't be simpler: 45 minutes in the oven transforms ordinary sweet potatoes into golden, glaze-coated perfection. You'll start with basic prep—scrubbing and poking holes—but the real magic happens when that sweet glaze caramelizes into a crunchy exterior that contrasts beautifully with the creamy interior.
This recipe works equally well as a side dish for roasted meats or as a vegetarian main course when topped with black beans, avocado, or a sprinkle of cheese.
What makes this recipe stand out is how versatile it is. You can adjust the glaze to suit your taste—maple syrup for a deeper sweetness, a touch of cayenne for heat, or even a drizzle of honey for extra richness.
The result is a dish that's foolproof, economical, and impressively elegant, making it perfect for everything from weeknight dinners to holiday feasts. Once you try this method, you'll never settle for plain baked sweet potatoes again.
The best part? This recipe scales effortlessly, so you can make just enough for two or double it for a crowd. The glaze keeps well in the fridge for up to a week, making it a great make-ahead option.
Whether you're serving it alongside roasted chicken, grilled salmon, or as part of a vegetarian spread, these glazed sweet potatoes will be the star of the meal. Let's get started!
Ingredients for baked glazed sweet potato
Four sweet potatoes and seven simple ingredients transform into restaurant-quality side dishes everyone will crave.
| Ingredient | Amount | Notes |
|---|---|---|
| Medium Sweet Potatoes 🍠 | 4 whole | Organic preferred, uniform size |
| Unsalted Butter 🧈 | ½ cup | Cold, cubed for glaze |
| Packed Brown Sugar 🍚 | ½ cup | Dark brown for deeper flavor |
| Ground Cinnamon 🌿 | 1 tbsp | Freshly ground preferred |
| Pure Maple Syrup 🍯 | 2 tbsp | Grade A for best flavor |
| Sea Salt 🧂 | ½ tsp | Fine grain preferred |
| Ground Cayenne Pepper 🔥 | ¼ tsp | Adjust for heat preference |
| Extra-Virgin Olive Oil 🫒 | 1 tbsp | For brushing potatoes |
| Fresh Rosemary 🌿 | ¼ cup | Chopped, for garnish |
The sweet potatoes are your canvas—organic if possible, but any medium-sized ones work. I grab mine from Whole Foods when I can, but the regular grocery store ones are fine too. Look for ones that feel heavy for their size (that means they're packed with moisture). For the glaze, Land O'Lakes butter is my go-to—it's consistent and melts beautifully. If you're making this for a crowd, buy extra potatoes and double the glaze. The brown sugar? Domino brand is my secret—it's finely ground and dissolves perfectly into the glaze without graininess.
No maple syrup? Honey works in a pinch—just reduce the amount slightly since it's sweeter. Running low on cinnamon? Cassia cinnamon is a direct swap, but it's slightly stronger so use half a teaspoon less. Want extra crunch? Sprinkle a pinch of granulated sugar on top before baking. The cayenne is optional, but I always include it—just a tiny pinch gives that little kick that makes the dish feel special. For the rosemary, fresh is ideal, but dried at one-third the amount works if you're in a rush. The olive oil is just for brushing—don't skimp, but don't go overboard either.
These keep beautifully in the fridge for 5 days—just reheat in the oven for 10 minutes at 350°F to restore that caramelized crust. For make-ahead prep, assemble the glaze and store it in the fridge, then brush on right before baking. The glaze also freezes well for 3 months—just thaw it in the fridge before using. I always make extra glaze because it's perfect for drizzling over oatmeal or yogurt too. The leftovers? Crunchy exterior, creamy center every time—guaranteed.
Why You'll Love This Recipe
- No-Peel Hassle: I swear by medium sweet potatoes here—they’re the perfect size for one person’s portion, and the skin stays tender enough to eat. No peeling, no fuss, just slice, glaze, and bake. That’s it.
- Sweet Caramel Magic: The combo of brown sugar and maple syrup creates this sticky, buttery glaze that’s ridiculously good—like dessert for dinner. Honestly, the first time I tasted it, I nearly licked the pan.
- Weeknight Meal Prep: Make a batch on Sunday, and you’ve got breakfast, lunch, or a snack covered all week. They reheat in 30 seconds, and the flavor only gets better the next day. (Yes, even on a Tuesday night.)
- Budget-Friendly Luxury: Sweet potatoes are cheap, and the glaze costs pennies. For under $2 per serving, you get something that tastes like it belongs on a holiday table. My secret weapon for stretching groceries without sacrificing flavor.
Step-by-step instructions for baked glazed sweet potatoes
Here's how to transform simple sweet potatoes into irresistible caramelized masterpieces with crispy edges and gooey interiors.
Prep and Roast the Sweet Potatoes
Preheat your oven to 425°F and line a baking sheet with parchment paper. Wash and dry the 4 whole medium sweet potatoes thoroughly—any moisture will prevent crispy skin. Using a fork, pierce each potato all over with several deep holes to allow steam to escape during baking.
Brush each potato generously with the 1 tablespoon extra-virgin olive oil, coating them evenly. Arrange them in a single layer on the prepared baking sheet, spacing them about 1 inch apart for proper air circulation. This spacing ensures even browning rather than steamy, soggy skins.
Roast for 45-50 minutes until the skins are deep golden brown and the potatoes feel tender when gently squeezed. You'll know they're perfect when a knife slides in easily near the stem end. If they're browning too quickly, tent loosely with foil to prevent burning while they finish cooking.
Make the Sweet Glaze
While the potatoes roast, create the glaze by melting the 0.5 cup unsalted butter in a small saucepan over medium-low heat. Once melted, remove from heat and whisk in the 0.5 cup packed brown sugar, 2 tablespoons pure maple syrup, 1 tablespoon ground cinnamon, 0.5 teaspoon sea salt, and 0.25 teaspoon ground cayenne pepper.
Return the mixture to low heat and stir constantly for 3-4 minutes until it thickens slightly and becomes glossy. You're aiming for a consistency between syrup and caramel—it should coat the back of a spoon but still flow smoothly. If it crystallizes, add 1 teaspoon water to dissolve it completely. This glaze is the secret to that perfect balance of sweet, spicy, and caramelized flavors.
Glaze and Crisp the Potatoes
Carefully transfer the roasted potatoes to a clean baking sheet. Using a pastry brush, generously coat each potato with the warm glaze, letting it drip down the sides. Place the sheet back in the oven and bake for an additional 10-15 minutes until the glaze bubbles and turns deep amber in color.
Here's where the magic happens: the residual heat transforms the glaze into a crispy caramel shell while keeping the potato centers tender. Watch closely during the last 2 minutes—the glaze should be bubbling vigorously and developing a crackly texture. If it thickens too quickly, brush on a little more glaze to maintain that beautiful caramelized finish.
Garnish and Serve
Remove the glazed potatoes from the oven and let them cool for 2-3 minutes—this brief rest prevents the glaze from sliding off when you transfer them. Sprinkle with the 0.25 cup chopped fresh rosemary right before serving to add a fragrant, herbal contrast to the sweet glaze.
Serve immediately while the glaze is still warm and crispy. The contrast between the caramelized exterior and the soft, buttery interior makes each bite irresistible. For an extra-special presentation, arrange them on a platter with the rosemary garnish fanned out around the base. These sweet potatoes make an impressive side dish for any meal—whether paired with grilled meats, roasted vegetables, or served as a vegetarian main course with a dollop of whipped cream or vanilla ice cream.
Pro Tips For Making Baked Glazed Sweet Potato
- PIERCE THE SKINS FIRST: I learned this the hard way—skipping this step means your glaze will pool at the bottom of the pan instead of caramelizing into the flesh. Use a sharp knife to score the top of each sweet potato in a crosshatch pattern before baking; it lets steam escape and guarantees even browning.
- USE SOFT BUTTER: Packed brown sugar and maple syrup are sticky enough on their own—don’t overwork the glaze by using cold butter straight from the fridge. Let the butter sit at room temperature for 20 minutes first, then mix it into the sugar and syrup until it’s just combined. Cold butter creates lumps that won’t melt into the sweet potatoes evenly.
- BAKE UNTIL FINGER-TESTED: Sweet potatoes are done when they yield to gentle pressure but still hold their shape—like a ripe avocado. Overbaking turns them mushy, and underbaking leaves them dense. Check at 45 minutes (400°F), then tent with foil if the edges are browning too fast. The glaze will thicken as they cool, so pull them out when they’re just tender.
- SWAP MAPLE FOR HONEY: Short on maple syrup? Honey works in a pinch, but here’s the catch: reduce it by 1 tablespoon per recipe and add ½ teaspoon of lemon juice to balance the sweetness. Honey’s lower water content means the glaze will cling better, but it burns faster—watch those sweet potatoes like a hawk after 30 minutes.
Make-ahead tips for baked glazed sweet potato
Glaze Prep Ahead
Make the glaze up to 3 days in advance and store it in an airtight container in the fridge.
I always prep this when I have a busy week ahead—just reheat the glaze in a small saucepan over low heat for 2-3 minutes until warm and smooth before brushing on the potatoes. This saves 15 minutes of active prep time on the day you cook. 💡
Potato Prep Shortcut
Use a vegetable peeler to remove the skin from the sweet potatoes before baking if you prefer a smoother texture. I do this when I'm serving them to kids or for a more refined presentation.
Just be sure to leave about ¼-inch of flesh on the sides so they hold their shape during baking. This also cuts down on active prep time by about 10 minutes. ✨
Double Batch Strategy
If you're feeding a crowd, double the recipe and bake both batches simultaneously on separate racks in your oven. I use two half-sheet pans for even airflow—this ensures both batches finish at the same time without overcrowding.
The glaze will need to be doubled as well, but you can make it in one large saucepan instead of two. This method saves 30 minutes of staggered baking time. 🔥
Freezer-Friendly Glaze
Freeze the glaze in ice cube trays for easy portioning. Pop out a cube or two when you're ready to glaze—this works perfectly for single servings or when you only need to glaze a few potatoes.
The frozen glaze thaws in about 5 minutes in the microwave, and you can reheat it gently to restore its glossy consistency. This is my go-to for meal prep Sundays. ❄️
Reheating Leftovers
Reheat glazed sweet potatoes in a 350°F oven for 10-12 minutes to restore that perfect caramelized crust. For a quick fix, microwave them covered for 1-2 minutes on high power, then brush with a little extra glaze to refresh the texture.
I always reheat them this way when I'm short on time—it takes just 3 minutes and keeps them delicious. 💫
Glaze Variations
Make a spiced orange glaze by adding 1 teaspoon grated orange zest and 1 tablespoon orange juice to the original recipe. For a peanut butter twist, stir in 2 tablespoons creamy peanut butter at the end.
Both versions keep just as well as the original—store them in the fridge for up to 5 days or freeze for 3 months. These variations are perfect for holiday gatherings when you want to offer different flavor options. 🍊
Nutrition facts
Frequently asked questions
Can I use regular potatoes instead of sweet potatoes?
No, this recipe is specifically designed for sweet potatoes because their natural sweetness and texture work perfectly with the caramelized glaze. Regular potatoes would absorb too much moisture and wouldn't develop that same delicious contrast between crispy exterior and creamy interior. The sweetness of sweet potatoes also balances beautifully with the cinnamon and cayenne in the glaze.
How do I fix potatoes that are too soft or mushy?
If your potatoes turn out too soft, they likely baked too long or weren't pierced properly. For future batches, reduce baking time by 5 minutes and check tenderness at 40 minutes. Always pierce them with a fork before baking to allow steam to escape. If you've already overbaked them, try reheating at 350°F for 5 minutes with an extra 1 teaspoon butter to restore some moisture.
Can I make this recipe in an air fryer?
Yes! Preheat your air fryer to 375°F and cook the potatoes for 20-25 minutes, flipping halfway through. After roasting, brush with the glaze and air fry for an additional 5-7 minutes until caramelized. The air fryer creates a similar crispy exterior but reduces cooking time by about 30 minutes compared to the oven method.
What's the best way to store leftovers?
Store glazed sweet potatoes in an airtight container in the fridge for up to 5 days. To maintain the best texture, reheat in a 350°F oven for 10-12 minutes until the glaze bubbles again. For longer storage, freeze the glazed potatoes (without reheating) for up to 3 months. Thaw overnight in the fridge before reheating.
Can I make this gluten-free or vegan?
For gluten-free, just ensure your brown sugar and spices are certified gluten-free. For a vegan version, substitute the butter with vegan butter or coconut oil, and use maple syrup or agave instead of honey. The recipe will still achieve that perfect caramelized texture while being completely plant-based.